Event stream slicing
Events are a sparse representation for brightness changes registered by an event camera. It is useful to group incoming events from a stream in certain time-windows or by a certain number. The dv-processing library provides an efficient, yet powerful tools to approach continuous slicing of events. Following chapters will provide samples on how to use available event stream slicer implementations to group events in specific batches.
EventStreamSlicer
dv::EventStreamSlicer implements event slicing for a single event stream. Incoming events are passed into
the slicer using the accept() method, the underlying implementation applies required slicing approach and resulting
sliced events are passed into registered callback methods. The slicing can be performed using fixed size time-windows or
fixed size number of events. According callback function can be registered using
dv::EventStreamSlicer::doEveryNumberOfEvents() or dv::EventStreamSlicer::doEveryTimeInterval()
methods. The registered callbacks and their calling parameters can also be modified later on.
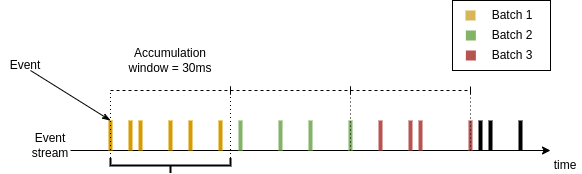
The approach can be visualized by looking at a stream of events coming from a camera as a time series. The slicing can be performed by splitting the stream by a fixed time window as shown in a diagram below:
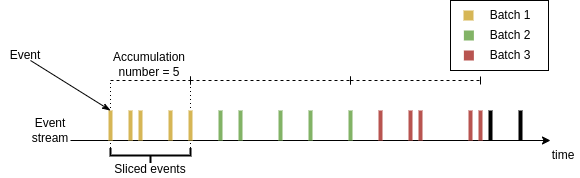
The other approach is to slice by a fixed number of events instead, as shown in the diagram below:
Slicing a stream
Following sample shows how to perform time-based slicing of an event stream:
 1#include <dv-processing/core/core.hpp>
 2#include <dv-processing/data/generate.hpp>
 3
 4int main() {
 5    // Use this namespace to enable literal time expression from the chrono library
 6    using namespace std::chrono_literals;
 7
 8    // Initialize slicer, it will have no jobs at this time
 9    dv::EventStreamSlicer slicer;
10
11    // Register this method to be called every 33 millisecond worth of event data
12    slicer.doEveryTimeInterval(33ms, [](const dv::EventStore &events) {
13        std::cout << "* Received events time-based slicing: " << events << std::endl;
14    });
15
16    // Register this method to be called every 100 events
17    slicer.doEveryNumberOfElements(100, [](const dv::EventStore &events) {
18        std::cout << "# Received events in number-based slicing: " << events << std::endl;
19    });
20
21    // Generate 1000 events within 2 second interval. These will be sliced correctly by the slicer.
22    const dv::EventStore store = dv::data::generate::uniformEventsWithinTimeRange(0, 2s, cv::Size(100, 100), 1000);
23
24    // Now push the store into the slicer, the data contents within the store
25    // can be arbitrary, the slicer implementation takes care of correct slicing
26    // algorithm and calls the previously registered callbacks accordingly.
27    slicer.accept(store);
28
29    return 0;
30}
 1import dv_processing as dv
 2from datetime import timedelta
 3
 4# Initialize slicer, it will have no jobs at this time
 5slicer = dv.EventStreamSlicer()
 6
 7
 8def print_time_interval(events: dv.EventStore):
 9    # Print the time duration received by this method
10    print(f"* Received events time-based slicing: {events}")
11
12
13# Register this method to be called every 33 millisecond worth of event data
14slicer.doEveryTimeInterval(timedelta(milliseconds=33), print_time_interval)
15
16
17def print_event_number(events: dv.EventStore):
18    # Print the number of events received here
19    print(f"# Received events in number-based slicing: {events}")
20
21
22# Register this method to be called every 100 events
23slicer.doEveryNumberOfEvents(100, print_event_number)
24
25# Generate 1000 events within 2 second interval. These will be sliced correctly by the slicer.
26store = dv.data.generate.uniformEventsWithinTimeRange(0, timedelta(seconds=2), (100, 100), 1000)
27
28# Now push the store into the slicer, the data contents within the store
29# can be arbitrary, the slicer implementation takes care of correct slicing
30# algorithm and calls the previously registered callbacks accordingly.
31slicer.accept(store)
Modifying slicing parameters
Slicing parameters can also be modified during runtime if needed. Following code sample is a modified version of the sample from previous chapter, which shows how to use the parameter modification methods:
 1#include <dv-processing/core/core.hpp>
 2#include <dv-processing/data/generate.hpp>
 3
 4int main() {
 5    // Use this namespace to enable literal time expression from the chrono library
 6    using namespace std::chrono_literals;
 7
 8    // Initialize slicer, it will have no jobs at this time
 9    dv::EventStreamSlicer slicer;
10
11    // Register this method to be called every 33 millisecond worth of event data
12    int timeJobId = slicer.doEveryTimeInterval(33ms, [](const dv::EventStore &events) {
13        std::cout << "* Received events time-based slicing: " << events << std::endl;
14    });
15
16    // Register this method to be called every 100 events
17    int numberJobId = slicer.doEveryNumberOfElements(100, [](const dv::EventStore &events) {
18        std::cout << "# Received events in number-based slicing: " << events << std::endl;
19    });
20
21    // Implement data generation; The following loop will generate 10 packets of events,
22    // each containing 100 events within 20 millisecond duration.
23    for (int i = 0; i < 10; i++) {
24        // Generate 100 events within 20 millisecond interval. These will be sliced correctly by the slicer.
25        const auto store = dv::data::generate::uniformEventsWithinTimeRange(i * 20'000, 20ms, cv::Size(100, 100), 100);
26
27        // Now push the store into the slicer, the data contents within the store
28        // can be arbitrary, the slicer implementation takes care of correct slicing
29        // algorithm and calls the previously registered callbacks accordingly.
30        slicer.accept(store);
31
32        // When a packet with index 5 is reached, modify the parameters
33        if (i == 5) {
34            // Modify time range to 10 milliseconds instead of 33
35            slicer.modifyTimeInterval(timeJobId, 10ms);
36            // Modify number to 200 instead of 100
37            slicer.modifyNumberInterval(numberJobId, 200);
38        }
39    }
40}
 1import dv_processing as dv
 2from datetime import timedelta
 3
 4# Initialize slicer, it will have no jobs at this time
 5slicer = dv.EventStreamSlicer()
 6
 7
 8def print_time_interval(events: dv.EventStore):
 9    # Print the time duration received by this method
10    print(f"* Received event with {events.duration()} duration in time-based slicing")
11
12
13# Register this method to be called every 33 millisecond worth of event data
14time_job_id = slicer.doEveryTimeInterval(timedelta(milliseconds=33), print_time_interval)
15
16
17def print_event_number(events: dv.EventStore):
18    # Print the number of events received here
19    print(f"# Received {events.size()} events in number-based slicing")
20
21
22# Register this method to be called every 100 events
23number_job_id = slicer.doEveryNumberOfEvents(100, print_event_number)
24
25# Implement data generation; The following loop will generate 10 stores
26# of events, each containing 100 events within 10 millisecond duration.
27for i in range(10):
28    # Generate 100 events within 20 millisecond interval. These will be sliced correctly by the slicer.
29    store = dv.data.generate.uniformEventsWithinTimeRange(i * 20000, timedelta(milliseconds=20), (100, 100), 100)
30
31    # Now push the store into the slicer, the data contents within the store
32    # can be arbitrary, the slicer implementation takes care of correct slicing
33    # algorithm and calls the previously registered callbacks accordingly.
34    slicer.accept(store)
35
36    # When a packet with index 5 is reached, modify the parameters
37    if i == 5:
38        # Modify time range to 10 milliseconds instead of 33
39        slicer.modifyTimeInterval(time_job_id, timedelta(milliseconds=10))
40        # Modify number to 200 instead of 100
41        slicer.modifyNumberInterval(number_job_id, 200)
Stereo stream slicer
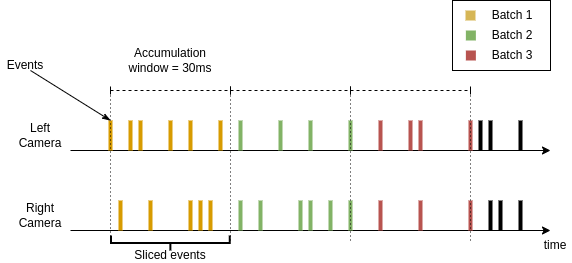
A dual stream slicer is required to perform synchronized time slicing from a stereo camera setup. This is implemented in
the dv::StereoEventStreamSlicer class. It implements stereo event stream slicing by applying regular stream
slicing on one of the input streams and performing time-based slicing within the same time-window. An illustration of
the approach for slicing by time is displayed below:
Since the input data can be coming at different rates, in case of slicing by number, the according event from right camera are selected within the same time window. This case is shown below:
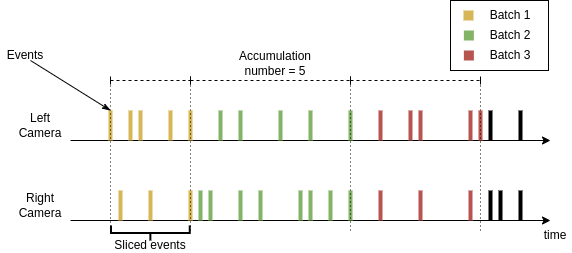
In the image above, the slicer is assumed to have a setting to slice every 5 events, these events are sliced from the left camera and their exact timestamps are used to slice events from the right camera.
A sample code on how to use stereo event stream slicer with a live camera is shown below:
 1#include <dv-processing/core/stereo_event_stream_slicer.hpp>
 2#include <dv-processing/io/stereo_capture.hpp>
 3
 4int main() {
 5    using namespace std::chrono_literals;
 6
 7    // Discover connected camera to the system
 8    const auto cameras = dv::io::discoverDevices();
 9    if (cameras.size() < 2) {
10        throw dv::exceptions::RuntimeError("Unable to discover two cameras");
11    }
12
13    // Open the cameras, just use first detected cameras
14    dv::io::StereoCapture stereo(cameras[0], cameras[1]);
15
16    // Initialize a stereo stream slicer
17    dv::StereoEventStreamSlicer slicer;
18
19    // Register a job to be performed every 33 milliseconds
20    slicer.doEveryTimeInterval(33ms, [](const dv::EventStore &leftEvents, const dv::EventStore &rightEvents) {
21        // Print durations for time-based slicing callback
22        std::cout << fmt::format(
23            "* Received events with duration: left[{}] - right[{}]", leftEvents.duration(), rightEvents.duration())
24                  << std::endl;
25    });
26
27    // Register a job to be performed every 1000 events
28    slicer.doEveryNumberOfEvents(
29        // Here we receive events from two camera, time-synchronized
30        1000, [](const dv::EventStore &leftEvents, const dv::EventStore &rightEvents) {
31            // Print event store sizes for number based slicing callback
32            std::cout << fmt::format("# Received events in number-based slicing, counts: left[{}] - right[{}]",
33                leftEvents.size(), rightEvents.size())
34                      << std::endl;
35        });
36
37    // Continue the loop while both cameras are connected
38    while (stereo.left.isRunning() && stereo.right.isRunning()) {
39        // Initialize
40        dv::EventStore left, right;
41
42        // Handle left camera events
43        if (const auto batch = stereo.left.getNextEventBatch(); batch.has_value()) {
44            left = *batch;
45        }
46
47        // Handle right camera events
48        if (const auto batch = stereo.right.getNextEventBatch(); batch.has_value()) {
49            right = *batch;
50        }
51
52        // Pass all events into the slicer
53        slicer.accept(left, right);
54    }
55
56    return 0;
57}
 1import dv_processing as dv
 2from datetime import timedelta
 3
 4# Discover connected camera to the system
 5cameras = dv.io.discoverDevices()
 6if len(cameras) < 2:
 7    raise RuntimeError("Unable to discover two cameras")
 8
 9# Open the cameras, just use first detected cameras
10stereo = dv.io.StereoCapture(cameras[0], cameras[1])
11
12# Initialize a stereo stream slicer
13slicer = dv.io.StereoEventStreamSlicer()
14
15
16# Callback method for time based slicing
17def print_time_interval(left_events: dv.EventStore, right_events: dv.EventStore):
18    # Print the time duration received by this method
19    print(f"* Received events with duration: left[{left_events.duration()}] - right[{right_events.duration()}]")
20
21
22# Register a job to be performed every 33 milliseconds
23slicer.doEveryTimeInterval(timedelta(milliseconds=33), print_time_interval)
24
25
26# Callback method for number based slicing
27def print_event_number(left_events: dv.EventStore, right_events: dv.EventStore):
28    # Print the number of events received here
29    print(
30        f"# Received events in number-based slicing, counts: left[{left_events.size()}] - right[{right_events.size()}]")
31
32
33# Register this method to be called every 1000 events
34slicer.doEveryNumberOfEvents(1000, print_event_number)
35
36# Continue the loop while both cameras are connected
37while stereo.left.isRunning() and stereo.right.isRunning():
38    # Initialize empty stores
39    left = dv.EventStore()
40    right = dv.EventStore()
41
42    # Receive packet from left camera
43    leftPacket = stereo.left.getNextEventBatch()
44    # Assign the packet if some data was received
45    if leftPacket is not None:
46        left = leftPacket
47
48    # Receive packet from right camera
49    rightPacket = stereo.right.getNextEventBatch()
50    # Assign the packet if some data was received
51    if rightPacket is not None:
52        right = rightPacket
53
54    # Pass all events into the slicer
55    slicer.accept(left, right)
Generic data stream slicing
Event stream slicers described previously are intended for efficient and specific slicing approach to event stream data.
The dv-processing library also provides a generic time-series data stream slicer class
dv::MultiStreamSlicer that applies the same approach, but supports arbitrary number of streams and
arbitrary data-types. The only requirement for data types is the timestamp data, that can be accessed through a
predefined API. The predefined API requirement is implemented using C++20 concepts and templates, so the requirement can
be satisfied by any type that can provide a microsecond timestamp expressed in a signed 64-bit integer.
The dv::MultiStreamSlicer class provides same slicing capabilities with methods allowing to slice by time
dv::MultiStreamSlicer::doEveryTimeInterval() or by number
dv::MultiStreamSlicer::doEveryNumberOfElements(). Since the dv::MultiStreamSlicer supports an
arbitrary number of streams, the streams are managed by assigning a unique string name to each stream by using the
dv::MultiStreamSlicer::addStream() method. By default, the slicer accepts the timestamped data types from
the DV flatbuffer type system, such as: dv::EventPacket, dv::IMUPacket, and other packet data
types. If a data type is provided without a container, it can be used with STL containers, such as std::vector or
dv-processing provided dv::cvector. In a case an image frame dv::Frame stream needs to be
sliced, it has to be wrapped in a container, e.g. using dv::cvector: dv::cvector<dv::Frame>. Such a
contained and timestamped data can be sliced alongside other data type streams.
To be clear about how the MultiStreamSlicer manages data slicing, it uses a convention of “main stream” and
“secondary streams”. Main stream is declared in the constructor of the class and all other stream are added using the
MultiStreamSlicer::addStream() method. The main stream is the driving data stream slicing; while secondary
streams are following the time-ranges that are sliced from the main stream, similar to how
dv::StereoEventStreamSlicer works.
Following sample shows the use of the MultiStreamSlicer to synchronously slice incoming frame and event
streams from a DAVIS346 camera and show a preview. The preview below
 1#include <dv-processing/core/multi_stream_slicer.hpp>
 2#include <dv-processing/io/camera_capture.hpp>
 3#include <dv-processing/visualization/event_visualizer.hpp>
 4
 5#include <opencv2/highgui.hpp>
 6#include <opencv2/imgproc.hpp>
 7
 8int main() {
 9    // Open a DAVIS camera, the sample will slice incoming frames and events synchronously using the generic data
10    // stream slicer. The camera name is an empty string to open any DAVIS camera detected on the system
11    dv::io::CameraCapture camera("", dv::io::CameraCapture::CameraType::DAVIS);
12
13    // Declare the main stream type to be dv::cvector<dv::Frame> with stream name "frames"
14    dv::MultiStreamSlicer<dv::cvector<dv::Frame>> slicer("frames");
15
16    // Add a secondary stream of events
17    slicer.addStream<dv::EventStore>("events");
18
19    // It's possible to add additional secondary streams for slicing here, e.g. adding a trigger stream
20    // would look like:
21    // slicer.addStream<dv::TriggerPacket>("triggers");
22
23    // Use visualizer to overlay events on a frame
24    dv::visualization::EventVisualizer visualizer(camera.getEventResolution().value(), dv::visualization::colors::white,
25        dv::visualization::colors::green, dv::visualization::colors::red);
26
27    // Declare display windows for frames
28    cv::namedWindow("Preview", cv::WINDOW_NORMAL);
29
30    // Register a job to be performed every frame, the event will be sliced in-between the main stream frames
31    slicer.doEveryNumberOfElements(
32        // Here we receive time-synchronized frames and events; sliced data is provided in a std::unordered_map
33        // for easy access using the stream name.
34        1, [&visualizer](const auto &data) {
35            // Extract events and pass them to the slicer, data is retrieved using the helper method `get()`
36            // which accepts the stream name and the type. Stream name and type has to match, otherwise
37            // an exception will be thrown
38            const auto events = data.template get<dv::EventStore>("events");
39
40            // Retrieve frames, although we get one frame per slice, it is stored in the configured container
41            const auto frames = data.template get<dv::cvector<dv::Frame>>("frames");
42
43            // The container is non-empty, we expect only one frame in the container, so just display
44            // the first frame in the container
45            const dv::Frame &frame = frames.at(0);
46
47            // Convert the frame into a grayscale image for overlay preview
48            cv::Mat preview;
49            if (frame.image.channels() == 3) {
50                // The image is already grayscale, no conversion is needed
51                preview = frame.image;
52            }
53            else {
54                // The image coming from the camera is multichannel image, so we can safely assume
55                // it's a grayscale image, convert it into BGR for overlay drawing
56                cv::cvtColor(frame.image, preview, cv::COLOR_GRAY2BGR);
57            }
58
59            // Overlay events on top of preview image
60            visualizer.generateImage(events, preview);
61
62            // Display the overlayed image
63            cv::imshow("Preview", preview);
64
65            // If escape button is pressed (code 27 is escape key), exit the program cleanly
66            if (cv::waitKey(2) == 27) {
67                exit(0);
68            }
69        });
70
71    // Continue the loop while both cameras are connected
72    while (camera.isRunning()) {
73        // Handle events
74        if (const auto events = camera.getNextEventBatch(); events.has_value()) {
75            slicer.accept("events", *events);
76        }
77
78        // Handle frames
79        if (const auto frame = camera.getNextFrame(); frame.has_value()) {
80            slicer.accept("frames", *frame);
81        }
82    }
83
84    return 0;
85}
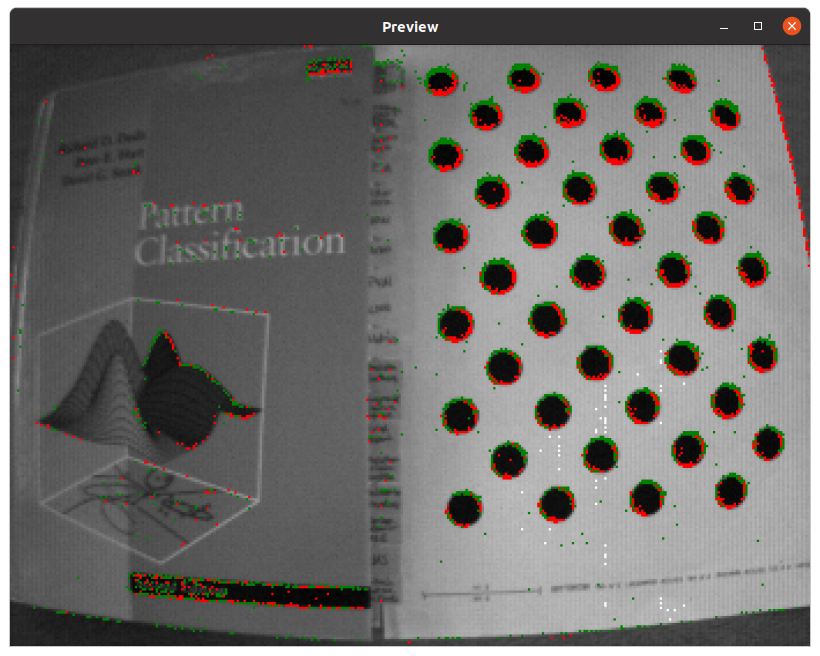
Output from the multi stream sample usage - frames with synchronized events overlayed in the frame image.
The multi stream slicer is also available in python, but due to missing template functionality in python, the python
version is more limited. dv.EventMultiStreamSlicer class is provided in python, which only supports events as main
stream and has slightly different API, but it supports arbitrary number of secondary streams, which can be of any type
that is built-in in dv-processing. Secondary streams can be added using named methods for types.
The example below shows the use of the multi-stream slicer in python which uses events as main stream and slices frames as secondary stream:
 1import dv_processing as dv
 2import cv2 as cv
 3from datetime import timedelta
 4
 5# Open the camera, just use first detected DAVIS camera
 6camera = dv.io.CameraCapture("", dv.io.CameraCapture.CameraType.DAVIS)
 7
 8# Initialize a multi-stream slicer
 9slicer = dv.EventMultiStreamSlicer("events")
10
11# Add a frame stream to the slicer
12slicer.addFrameStream("frames")
13
14# Initialize a visualizer for the overlay
15visualizer = dv.visualization.EventVisualizer(camera.getEventResolution(), dv.visualization.colors.white(),
16                                              dv.visualization.colors.green(), dv.visualization.colors.red())
17
18# Create a window for image display
19cv.namedWindow("Preview", cv.WINDOW_NORMAL)
20
21
22# Callback method for time based slicing
23def display_preview(data):
24    # Retrieve frame data using the named method and stream name
25    frames = data.getFrames("frames")
26
27    # Retrieve event data
28    events = data.getEvents("events")
29
30    # Retrieve and color convert the latest frame of retrieved frames
31    latest_image = None
32    if len(frames) > 0:
33        if len(frames[-1].image.shape) == 3:
34            # We already have colored image, no conversion
35            latest_image = frames[-1].image
36        else:
37            # Image is grayscale, convert to color (BGR image)
38            latest_image = cv.cvtColor(frames[-1].image, cv.COLOR_GRAY2BGR)
39    else:
40        return
41
42    # Generate a preview and show the final image
43    cv.imshow("Preview", visualizer.generateImage(events, latest_image))
44
45    # If escape button is pressed (code 27 is escape key), exit the program cleanly
46    if cv.waitKey(2) == 27:
47        exit(0)
48
49
50# Register a job to be performed every 33 milliseconds
51slicer.doEveryTimeInterval(timedelta(milliseconds=33), display_preview)
52
53# Continue the loop while both cameras are connected
54while camera.isRunning():
55    events = camera.getNextEventBatch()
56    if events is not None:
57        slicer.accept("events", events)
58
59    frame = camera.getNextFrame()
60    if frame is not None:
61        slicer.accept("frames", [frame])
This sample will result in similar output to the C++ version, but it rather synchronizes events to frames, so output of the samples are comparable, but not exact.